| Outside |
|---|

|
성견의 탑: 두 판 사이의 차이
kiseki
다른 명령
잔글 판 1개를 가져왔습니다 |
Localize no-pipe links to Korean (step 1, code-only) |
||
| (같은 사용자의 중간 판 16개는 보이지 않습니다) | |||
| 4번째 줄: | 4번째 줄: | ||
|caption1 = Stargazer's Tower | |caption1 = Stargazer's Tower | ||
|game = {{g|Crossbell}}, {{g|Sen III IV}} | |game = {{g|Crossbell}}, {{g|Sen III IV}} | ||
|country = [[ | |country = [[크로스벨]] | ||
|northloc = | |northloc = | ||
|westloc = | |westloc = | ||
|eastloc = [[ | |eastloc = [[우르술라 샛길]] | ||
|southloc = | |southloc = | ||
}} | }} | ||
The '''Stargazer's Tower''' ({{furi|星見|ほしみ}}の{{furi|塔|とう}}) is an ancient tower in [[ | The '''Stargazer's Tower''' ({{furi|星見|ほしみ}}の{{furi|塔|とう}}) is an ancient tower in [[크로스벨]]. | ||
== {{g|Zero}} == | == {{g|Zero}} == | ||
=== Background === | === Background === | ||
Stargazer's Tower was originally constructed by the Crossbellan alchemists during the [[ | Stargazer's Tower was originally constructed by the Crossbellan alchemists during the [[중세]] (c. S.700), like the [[달의 사원]] and the [[태양의 요새]]. | ||
Since the [[ | Since the [[크로스벨 경찰]] discovered the tower is on the verge of collapse in S.1194, they have barricaded its entrance, but before [[아르크 앙 시엘]]'s private performance where [[리샤 마오]] would make her first appearance, [[인]] entered the tower and met with the [[특무지원과]] inside. Yin described the tower as 'the place where alchemists of time long past dreamt their dreams', and requested the SSS to find the real culprit behind the threat letter sent to [[일리야 플라티에]] in their name. | ||
The higher elements are always present inside the tower, populated with various alchemical monsters and monsters. On the second floor, an enormous balance scale in perpetual motion can be found. The upper floors of the tower house an enormous collection of ancient books, which disappeared in the second of half S.1204. It also features two objects resembling armillary spheres, the left one glowing orange and the right one glowing blue. On top of the tower is an enormous bell, identical to the one found on [[ | The higher elements are always present inside the tower, populated with various alchemical monsters and monsters. On the second floor, an enormous balance scale in perpetual motion can be found. The upper floors of the tower house an enormous collection of ancient books, which disappeared in the second of half S.1204. It also features two objects resembling armillary spheres, the left one glowing orange and the right one glowing blue. On top of the tower is an enormous bell, identical to the one found on [[크로스벨 시]]'s [[Crossbell City/Central Square|Central Square]] and the [[달의 사원]]. | ||
=== Maps === | === Maps === | ||
| 262번째 줄: | 262번째 줄: | ||
{{SpoilerSection|Ao}} | {{SpoilerSection|Ao}} | ||
After the declaration of independence, the [[ | After the declaration of independence, the [[크로이스가]]'s plan to recreate their lost [[일곱 지보]] comes to fruition, with the bell at the top of the tower resonating to send elemental energy to [[오르키스 타워]], where it gets combined with the other elements and sent to the [[거울의 성]] for [[KeA Bannings|KeA]]'s ascension. | ||
Following the ascension, the bells on the tower and the [[ | Following the ascension, the bells on the tower and the [[달의 사원]] help maintain the barrier over [[크로스벨 시]], as explained to the SSS by [[요르그 로젠베르크]]. After dealing with [[캄파넬라]] in the Moon Temple, they head to Stargazer's tower, where they face off against the [[철기대]], their archaisms, and [[아리안로드]]. Arianrhod reveals KeA herself asked her to stand in their way to stop them from having to fight against [[시그문트 올랜도]] and [[아리오스 매클레인]]. During this time, the tower is repopulated, and the higher elements are once again present. | ||
Satisfied with the SSS' strength, Arianrhod leaves voluntarily and lets them disable the bell, dispelling the barrier over the city and allowing them to assault it directly while their allies face off against the [[Aion|Aions]], the [[ | Satisfied with the SSS' strength, Arianrhod leaves voluntarily and lets them disable the bell, dispelling the barrier over the city and allowing them to assault it directly while their allies face off against the [[Aion|Aions]], the [[붉은 성좌]] and the [[크로스벨 국방군]]. | ||
<span style="font-size:18px;font-weight:500;margin:24px 0 12px">Maps</span> | <span style="font-size:18px;font-weight:500;margin:24px 0 12px">Maps</span> | ||
| 528번째 줄: | 528번째 줄: | ||
== {{g|Sen III}} == | == {{g|Sen III}} == | ||
=== Background === | === Background === | ||
After [[우로보로스]]' attack on [[오르키스 타워]], old [[VII반]] tracks the [[아이온 Type-βII]] with help from [[티오 플래토]] to Stargazer's Tower. Accompanied by [[올리발트 라이제 아르노르]], they travel to the tower to face [[맥번]] and [[캄파넬라]] at the top. They force McBurn into his Blazing Demon form, but Campanella blocks [[Rean Schwarzer|Rean]] from summoning [[발리마르]] with a barrier. | |||
New Class VII, plus [[애시 카바이드]] and [[뮤제 이그리트]], arrive and use a beacon to direct a [[기갑병]] with Valimar to break through the barrier, fighting and disabling the Aion. McBurn calls out to [[비타 클로틸드]] and [[Crow Armbrust|Azure Siegfried]], an agent of the [[그노움]], who had been observing until then. As McBurn incinerates the Aion into slag and Campanella announces the reclamation of the [[환염계획]], Siegfried leaves with [[Ordine|an azure Divine Knight]]. | |||
=== Maps === | === Maps === | ||
<tabber> | |||
|-|Outside= | |||
{| class="article-table" style="width:100%" | |||
!Outside | |||
|- | |||
|style="text-align:center"|[[File:Stargazer's Tower Outside (CS3).png|borderless]] | |||
|} | |||
|-|Entrance= | |||
{| class="article-table" style="width:100%" | |||
!Entrance | |||
|- | |||
|style="text-align:center"|[[File:Stargazer's Tower Entrance (CS3).png|borderless]] | |||
|} | |||
|-|1F= | |||
{| class="article-table" style="width:100%" | |||
!1F | |||
|- | |||
|style="text-align:center"|[[File:Stargazer's Tower 1F (CS3).png|borderless]] | |||
|} | |||
|-|2F= | |||
{| class="article-table" style="width:100%" | |||
!2F | |||
|- | |||
|style="text-align:center"|[[File:Stargazer's Tower 2F (CS3).png|borderless]] | |||
|} | |||
|-|3F= | |||
{| class="article-table" style="width:100%" | |||
!3F | |||
|- | |||
|style="text-align:center"|[[File:Stargazer's Tower 3F (CS3).png|borderless]] | |||
|} | |||
|-|4F= | |||
{| class="article-table" style="width:100%" | |||
!4F | |||
|- | |||
|style="text-align:center"|[[File:Stargazer's Tower 4F (CS3).png|borderless]] | |||
|} | |||
|-|Exterior 1= | |||
{| class="article-table" style="width:100%" | |||
!Exterior 1 | |||
|- | |||
|style="text-align:center"|[[File:Stargazer's Tower Exterior 1 (CS3).png|borderless]] | |||
|} | |||
|-|5F= | |||
{| class="article-table" style="width:100%" | |||
!5F | |||
|- | |||
|style="text-align:center"|[[File:Stargazer's Tower 5F (CS3).png|borderless]] | |||
|} | |||
|-|6F= | |||
{| class="article-table" style="width:100%" | |||
!6F | |||
|- | |||
|style="text-align:center"|[[File:Stargazer's Tower 6F (CS3).png|borderless]] | |||
|} | |||
|-|7F= | |||
{| class="article-table" style="width:100%" | |||
!7F | |||
|- | |||
|style="text-align:center"|[[File:Stargazer's Tower 7F (CS3).png|borderless]] | |||
|} | |||
|-|Exterior 2= | |||
{| class="article-table" style="width:100%" | |||
!Exterior 2 | |||
|- | |||
|style="text-align:center"|[[File:Stargazer's Tower Exterior 2 (CS3).png|borderless]] | |||
|} | |||
|-|8F= | |||
{| class="article-table" style="width:100%" | |||
!8F | |||
|- | |||
|style="text-align:center"|[[File:Stargazer's Tower 8F (CS3).png|borderless]] | |||
|} | |||
|-|Roof= | |||
{| class="article-table" style="width:100%" | |||
!Roof | |||
|- | |||
|style="text-align:center"|[[File:Stargazer's Tower Roof (CS3).png|borderless]] | |||
|} | |||
</tabber> | |||
=== [[List of enemies (Cold Steel III)/Stargazer's Tower|Enemies]] === | === [[List of enemies (Cold Steel III)/Stargazer's Tower|Enemies]] === | ||
| 566번째 줄: | 649번째 줄: | ||
|✓ | |✓ | ||
|✓ | |✓ | ||
|Story | |[[List of quests (Cold Steel III)/Chapter 2/Field Exercises - Crossbell|Story]] | ||
| | | | ||
|- | |- | ||
| 572번째 줄: | 655번째 줄: | ||
| | | | ||
| | | | ||
|Story | |[[List of quests (Cold Steel III)/Chapter 2/Field Exercises - Crossbell|Story]] | ||
| | | | ||
|- | |- | ||
| 579번째 줄: | 662번째 줄: | ||
| | | | ||
| | | | ||
|Story | |[[List of quests (Cold Steel III)/Chapter 2/Field Exercises - Crossbell|Story]] | ||
|- | |- | ||
|style="text-align:left"|[[List of enemies (Cold Steel III)/Stargazer's Tower#McBurn, Almighty Conflagration|'''McBurn, Almighty Conflagration''']] | |style="text-align:left"|[[List of enemies (Cold Steel III)/Stargazer's Tower#McBurn, Almighty Conflagration|'''McBurn, Almighty Conflagration''']] | ||
| 585번째 줄: | 668번째 줄: | ||
| | | | ||
| | | | ||
|Story | |[[List of quests (Cold Steel III)/Chapter 2/Field Exercises - Crossbell|Story]] | ||
|- | |- | ||
|style="text-align:left"|[[List of enemies (Cold Steel III)/Stargazer's Tower#McBurn the Blazing Demon|'''McBurn the Blazing Demon''']] | |style="text-align:left"|[[List of enemies (Cold Steel III)/Stargazer's Tower#McBurn the Blazing Demon|'''McBurn the Blazing Demon''']] | ||
| 591번째 줄: | 674번째 줄: | ||
| | | | ||
| | | | ||
|Story | |[[List of quests (Cold Steel III)/Chapter 2/Field Exercises - Crossbell|Story]] | ||
|} | |} | ||
=== [[List of treasure chests (Cold Steel III)|Treasure Chests]] === | === [[List of treasure chests (Cold Steel III)#Crossbell|Treasure Chests]] === | ||
{| class="article-table | {| class="article-table" style="width:100%" | ||
! style="width:1%" |Key | ! style="width:1%" |Key | ||
! | !Contents | ||
|- | |- | ||
!1 | !1 | ||
| 603번째 줄: | 686번째 줄: | ||
|- | |- | ||
!2 | !2 | ||
|{{Quartz|Time R|Sen}} Black Bell | |{{Quartz|Time R|Sen III}} Black Bell | ||
|- | |- | ||
!3 | !3 | ||
|{{Item| | |{{Item|U-Material|Sen III}} U-Material ×5 | ||
|- | |- | ||
!4 | !4 | ||
|{{Sepith|Earth|Sen}}{{Sepith|Water|Sen}}{{Sepith|Fire|Sen}}{{Sepith|Wind|Sen}}{{Sepith|Time|Sen}}{{Sepith|Space|Sen}}{{Sepith|Mirage|Sen}} All | |{{Sepith|Earth|Sen III}}{{Sepith|Water|Sen III}}{{Sepith|Fire|Sen III}}{{Sepith|Wind|Sen III}}{{Sepith|Time|Sen III}}{{Sepith|Space|Sen III}}{{Sepith|Mirage|Sen III}} All Sepith ×50 | ||
|- | |- | ||
!5 | !5 | ||
| 615번째 줄: | 698번째 줄: | ||
|- | |- | ||
!6 | !6 | ||
|{{Quartz|Space R|Sen}} Luck | |{{Quartz|Space R|Sen III}} Luck | ||
|- | |- | ||
!7 | !7 | ||
|{{Item|Potion|Sen III}} Tearal Balm | |{{Item|Potion|Sen III}} Tearal Balm, {{Item|Potion|Sen III}} EP Charge III, {{Item|Potion|Sen III}} Celestial Balm | ||
|} | |} | ||
=== [[List of quests (Cold Steel III)|Quests]] === | === [[List of quests (Cold Steel III)|Quests]] === | ||
*[[List of quests (Cold Steel III)/Chapter 2/Field Exercises - Crossbell|Field Exercises - Crossbell]]: Class VII tracks Ouroboros' Aion to Stargazer's Tower. | |||
== {{g|Sen IV}} == | == {{g|Sen IV}} == | ||
=== Maps === | === Maps === | ||
<tabber> | |||
|-|Outside= | |||
{| class="article-table" style="width:100%" | |||
!Outside | |||
|- | |||
|style="text-align:center"|[[File:Stargazer's Tower Outside (CS4).png|borderless]] | |||
|} | |||
|-|Entrance= | |||
{| class="article-table" style="width:100%" | |||
!Entrance | |||
|- | |||
|style="text-align:center"|[[File:Stargazer's Tower Entrance (CS3).png|borderless]] | |||
|} | |||
|-|1F= | |||
{| class="article-table" style="width:100%" | |||
!1F | |||
|- | |||
|style="text-align:center"|[[File:Stargazer's Tower 1F (CS3).png|borderless]] | |||
|} | |||
|-|2F= | |||
{| class="article-table" style="width:100%" | |||
!2F | |||
|- | |||
|style="text-align:center"|[[File:Stargazer's Tower 2F (CS3).png|borderless]] | |||
|} | |||
|-|3F= | |||
{| class="article-table" style="width:100%" | |||
!3F | |||
|- | |||
|style="text-align:center"|[[File:Stargazer's Tower 3F (CS3).png|borderless]] | |||
|} | |||
|-|4F= | |||
{| class="article-table" style="width:100%" | |||
!4F | |||
|- | |||
|style="text-align:center"|[[File:Stargazer's Tower 4F (CS3).png|borderless]] | |||
|} | |||
|-|Exterior 1= | |||
{| class="article-table" style="width:100%" | |||
!Exterior 1 | |||
|- | |||
|style="text-align:center"|[[File:Stargazer's Tower Exterior 1 (CS3).png|borderless]] | |||
|} | |||
|-|5F= | |||
{| class="article-table" style="width:100%" | |||
!5F | |||
|- | |||
|style="text-align:center"|[[File:Stargazer's Tower 5F (CS3).png|borderless]] | |||
|} | |||
|-|6F= | |||
{| class="article-table" style="width:100%" | |||
!6F | |||
|- | |||
|style="text-align:center"|[[File:Stargazer's Tower 6F (CS3).png|borderless]] | |||
|} | |||
|-|7F= | |||
{| class="article-table" style="width:100%" | |||
!7F | |||
|- | |||
|style="text-align:center"|[[File:Stargazer's Tower 7F (CS3).png|borderless]] | |||
|} | |||
|-|Exterior 2= | |||
{| class="article-table" style="width:100%" | |||
!Exterior 2 | |||
|- | |||
|style="text-align:center"|[[File:Stargazer's Tower Exterior 2 (CS3).png|borderless]] | |||
|} | |||
|-|8F= | |||
{| class="article-table" style="width:100%" | |||
!8F | |||
|- | |||
|style="text-align:center"|[[File:Stargazer's Tower 8F (CS3).png|borderless]] | |||
|} | |||
|-|Roof= | |||
{| class="article-table" style="width:100%" | |||
!Roof | |||
|- | |||
|style="text-align:center"|[[File:Stargazer's Tower Roof (CS3).png|borderless]] | |||
|} | |||
</tabber> | |||
=== [[List of enemies (Cold Steel IV)/Stargazer's Tower|Enemies]] === | === [[List of enemies (Cold Steel IV)/Stargazer's Tower|Enemies]] === | ||
{| class="article-table" style="width:100%;table-layout: fixed;text-align:center" | {| class="article-table" style="width:100%;table-layout: fixed;text-align:center" | ||
!style="width:20%"|Enemy | !style="width:20%"|Enemy | ||
! | !1-4F | ||
! | !5-7F | ||
! | !8F | ||
!Roof | !Roof | ||
|- | |- | ||
| 671번째 줄: | 832번째 줄: | ||
|✓ | |✓ | ||
|✓ | |✓ | ||
| | |||
|- | |||
|style="text-align:left"|[[List_of_enemies_(Cold_Steel_IV)/EXTRA#Golden Pom 8|Golden Pom - 8]] | |||
|style="font-size:12px"|W/ Living Armor | |||
|style="font-size:12px"|W/ Living Armor | |||
|style="font-size:12px"|W/ Living Armor | |||
| | | | ||
|- | |- | ||
| 677번째 줄: | 844번째 줄: | ||
| | | | ||
| | | | ||
| | |[[List_of_rewards_(Cold_Steel_IV)#Cryptids|Cryptid]] | ||
|} | |} | ||
=== [[List of treasure chests (Cold Steel IV)|Treasure Chests]] === | === [[List of treasure chests (Cold Steel IV)#Crossbell|Treasure Chests]] === | ||
{| class="article-table | {| class="article-table" style="width:100%" | ||
! style="width:1%" |Key | ! style="width:1%" |Key | ||
! | !Contents | ||
|- | |- | ||
!1 | !1 | ||
| | |{{Item|Potion|Sen III}} Brave Seed | ||
|- | |- | ||
!2 | !2 | ||
|{{ | |{{Quartz|Earth SR|Sen III}} Genbu | ||
|- | |- | ||
!3 | !3 | ||
|{{ | |{{Item|Accessory|Sen III}} Passionate Rouge | ||
|- | |- | ||
!4 | !4 | ||
|{{Sepith|Earth|Sen}}{{Sepith|Water|Sen}}{{Sepith|Fire|Sen}}{{Sepith|Wind|Sen}}{{Sepith|Time|Sen}}{{Sepith|Space|Sen}}{{Sepith|Mirage|Sen}} All | |{{Sepith|Earth|Sen III}}{{Sepith|Water|Sen III}}{{Sepith|Fire|Sen III}}{{Sepith|Wind|Sen III}}{{Sepith|Time|Sen III}}{{Sepith|Space|Sen III}}{{Sepith|Mirage|Sen III}} All Sepith ×200 | ||
|- | |- | ||
!5 | !5 | ||
|{{Item| | |{{Item|U-Material|Sen III}} U-Material ×5 | ||
|- | |- | ||
!6 | !6 | ||
|{{ | |{{Quartz|Time SR|Sen III}} Umbral Gyre | ||
|- | |- | ||
!7 | !7 | ||
|{{ | |{{Item|Potion|Sen III}} Zeram Powder | ||
|- | |- | ||
! | !Trial | ||
|{ | |style="padding:0px"| | ||
{| class="article-table" style="width:100%;margin:0px" | |||
! style="width:12ch" |Characters | |||
! style="width:14ch" |Order Upgraded | |||
!Contents | |||
|- | |||
|[[File:Rean Small (Sen IV).png|48px|link=|Rean]] [[File:Ash Small (Sen III).png|48px|link=|Ash]]<br>[[File:Laura Small (Sen III).png|48px|link=|Laura]] [[File:Gaius Small (Sen III).png|48px|link=|Gaius]] | |||
|Gold Dragon | |||
|[[List_of_enemies_(Cold_Steel_IV)/Trial_Chests#Gildarganon|Gildarganon]] | |||
|} | |||
|} | |} | ||
2026년 7월 30일 (목) 18:02 기준 최신판
The Stargazer's Tower (
영웅전설 제로의 궤적
Background
Stargazer's Tower was originally constructed by the Crossbellan alchemists during the 중세 (c. S.700), like the 달의 사원 and the 태양의 요새.
Since the 크로스벨 경찰 discovered the tower is on the verge of collapse in S.1194, they have barricaded its entrance, but before 아르크 앙 시엘's private performance where 리샤 마오 would make her first appearance, 인 entered the tower and met with the 특무지원과 inside. Yin described the tower as 'the place where alchemists of time long past dreamt their dreams', and requested the SSS to find the real culprit behind the threat letter sent to 일리야 플라티에 in their name.
The higher elements are always present inside the tower, populated with various alchemical monsters and monsters. On the second floor, an enormous balance scale in perpetual motion can be found. The upper floors of the tower house an enormous collection of ancient books, which disappeared in the second of half S.1204. It also features two objects resembling armillary spheres, the left one glowing orange and the right one glowing blue. On top of the tower is an enormous bell, identical to the one found on 크로스벨 시's Central Square and the 달의 사원.
Maps
| Entrance |
|---|

|
| 1F |
|---|

|
| 2F |
|---|

|
| 3F |
|---|

|
| Exterior |
|---|

|
| 4F |
|---|

|
| 5F |
|---|

|
| 6F |
|---|

|
| 7F |
|---|

|
| Roof |
|---|

|
Enemies
| Enemy | 1F | 2F | 3F | 4F | 5F | 6F | 7F | Roof |
|---|---|---|---|---|---|---|---|---|
| Living Armor | Story | ✓ | ✓ | ✓ | ✓ | |||
| Living Axe | ✓ | ✓ | W/ Living Armor | W/ Living Armor | W/ Living Armor | |||
| Living Shield | ✓ | ✓ | W/ Living Armor | W/ Living Armor | W/ Living Armor | |||
| Parrot Snake | ✓ | ✓ | ||||||
| Shadow Beast | ✓ | W/ Death Slugger | ✓ | W/ Death Slugger | ||||
| Death Slugger | ✓ | ✓ | ✓ | |||||
| Yin | Story | |||||||
| Yin (Clone) | Summoned by Yin | |||||||
| Iron Stark | Chest 5 | |||||||
| Org Virage | Quest |
Treasure Chests
| Key | Contents | Chest Quote |
|---|---|---|
| 1 |  Reviving Balm Reviving Balm
|
Sorry, I'll need to ask you to take a seat and wait for now. I'm very busy, so I'll be with you shortly. I am the Chest Executive Officer, after all. |
| 2 |  Stamp Jumpers Stamp Jumpers
|
Monsters: Living Axe ×4, Living Shield ×2 |
| What do you say when your divine wolf sneezes? ...Goodhoundzeit! | ||
| 3 |  Proxy Puppet Proxy Puppet
|
I hear the Strega Corporation made a job offer to Noel. Please look forward to the latest in Zemurian footwear: Noel Sneakers. |
| 4 | Celestial Balm
|
I haven't been opened in 500 years... I can finally move on to the next life. Thank you... |
| 5 |  Leo Gem Leo Gem
|
Monsters: Iron Stark ×3 |
| You came back! You actually came back for me! | ||
| 6 |  EP 2 EP 2
|
Honestly, I'd love to give you another item, but I don't make the rules around here. |
| 7 | Curia Balm
|
You know what they say: ... I wouldn't know. I've always been here. |
| 8 | Teara Balm
|
Upon further inspection, you found a Zeram Capsule. ...Pfft. You wish. |
| 9 | Holy Chain
|
Monsters: Death Slugger ×4, Shadow Beast ×2 |
| Legends say that if you kill 777 Shining Poms and come back here...you will find this chest is still empty. |
Quests
- Threat Letter Investigation: Yin calls the SSS to the tower to clear their name.
- The Many Famous Views of Crossbell: The Stargazer's Tower seen from the middle of the ramp outside is one of the spots to be photographed.
- Stargazer's Tower Monster Extermination: Org Virage can be found on the roof.
영웅전설 벽의 궤적
Background
Upon investigating the tower for a request to examine the libraries, the SSS finds the tower devoid of enemies, chests and books, save for a handful in the 7th floor.

Hello there, beautiful. May I have a moment of your time?
Please be aware spoilers for 영웅전설 벽의 궤적 may be present in the following section. Hit [Show] on the right if the show must go on. Adios, amigos!
After the declaration of independence, the 크로이스가's plan to recreate their lost 일곱 지보 comes to fruition, with the bell at the top of the tower resonating to send elemental energy to 오르키스 타워, where it gets combined with the other elements and sent to the 거울의 성 for KeA's ascension.
Following the ascension, the bells on the tower and the 달의 사원 help maintain the barrier over 크로스벨 시, as explained to the SSS by 요르그 로젠베르크. After dealing with 캄파넬라 in the Moon Temple, they head to Stargazer's tower, where they face off against the 철기대, their archaisms, and 아리안로드. Arianrhod reveals KeA herself asked her to stand in their way to stop them from having to fight against 시그문트 올랜도 and 아리오스 매클레인. During this time, the tower is repopulated, and the higher elements are once again present.
Satisfied with the SSS' strength, Arianrhod leaves voluntarily and lets them disable the bell, dispelling the barrier over the city and allowing them to assault it directly while their allies face off against the Aions, the 붉은 성좌 and the 크로스벨 국방군.
Maps
| Outside |
|---|
|
|
| Entrance |
|---|
|
|
| 1F |
|---|
.png)
|
| 2F |
|---|
.png)
|
| 3F |
|---|
.png)
|
| Exterior |
|---|
|
|
| 4F |
|---|
.png)
|
| 5F |
|---|
.png)
|
| 6F |
|---|
|
|
| 7F |
|---|
|
|
| Roof |
|---|
|
|
| Enemy | 1F | 2F | 3F | 4F | 5F | 6F | 7F | Roof |
|---|---|---|---|---|---|---|---|---|
| Sleipnir | Story | Story | Story | Story | ||||
| Living Armor | ✓ | ✓ | ✓ | ✓ | ||||
| Living Axe | ✓ | ✓ | W/ Living Armor | W/ Living Armor | W/ Living Armor | |||
| Living Shield | ✓ | ✓ | W/ Living Armor | W/ Living Armor | W/ Living Armor | |||
| Parrot Snake | ✓ | ✓ | ||||||
| Shadow Beast | ✓ | W/ Death Slugger | ✓ | W/ Death Slugger | ||||
| Death Slugger | ✓ | ✓ | ✓ | |||||
| Ines the Stout | Story | |||||||
| Ennea the Sharp | Story | |||||||
| Duvalie the Swift | Story | |||||||
| Duvalie the Swift (Clone) | Summoned by Duvalie the Swift | |||||||
| Arianrhod | Story | |||||||
| Arianrhod (Unmasked) | Transform from Arianrhod |
| Key | Contents | Chest Quote |
|---|---|---|
| 1 |        All sepith ×200 All sepith ×200
|
Every chest you open gets Ouroboros one step closer to obtaining the Sept-Terrion of Chests. |
| 2 | Kaleido Boots
|
You ever stop and think about how the CPD awarded you 5 DP for breaking out of prison? |
| 3 |  Lady Brand Lady Brand
|
You find what appears to be a botched attempt at Fierce Tiger Chao Fan. Elie suddenly seems to be in a hurry to leave the area. |
| 4 |  Quartz Fragment Quartz Fragment
|
Goddess forbid Crossbell becomes part of the Empire again. The Imperial government would probably silence all of us Crossbellan chests for good! |
| 5 |  Gouma Shiranui Gouma Shiranui
|
Keep an eye on that Rixia Mao. I have reason to believe that she is engaged in thespionage. |
| 6 |  Seven Dragons' Armor Seven Dragons' Armor
|
If you keep checking every chest in this tower, we're going to start calling your team the Stallritter. |
| 7 |  Dark Impulse Dark Impulse
|
Our realities exist as we observe and interpret them. As such, Mishy is the greatest. -- Tio Plato's Allegory of the Stave |
| 8 |  Pluto Bell Pluto Bell
|
Monsters: Living Armor ×4, Living Axe ×2, Living Shield ×2 |
| Take me down to the Crossbell City ♪ Where the Pleroma is blue and the girls are pretty ♪ Oh, won't you please take me down? ♪ |
There we go, the end of spoilers. Thank you for your time!
Quests
- For Old Tomes' Sake: The SSS is asked to investigate the ancient books of the tower.
- Conquering the Temple and Tower: The SSS needs to stop the bell at the top of the tower to release Crossbell City from its barrier.
영웅전설 섬의 궤적 III
Background
After 우로보로스' attack on 오르키스 타워, old VII반 tracks the 아이온 Type-βII with help from 티오 플래토 to Stargazer's Tower. Accompanied by 올리발트 라이제 아르노르, they travel to the tower to face 맥번 and 캄파넬라 at the top. They force McBurn into his Blazing Demon form, but Campanella blocks Rean from summoning 발리마르 with a barrier.
New Class VII, plus 애시 카바이드 and 뮤제 이그리트, arrive and use a beacon to direct a 기갑병 with Valimar to break through the barrier, fighting and disabling the Aion. McBurn calls out to 비타 클로틸드 and Azure Siegfried, an agent of the 그노움, who had been observing until then. As McBurn incinerates the Aion into slag and Campanella announces the reclamation of the 환염계획, Siegfried leaves with an azure Divine Knight.
Maps
| Outside |
|---|
.png)
|
| Entrance |
|---|
.png)
|
| 1F |
|---|
.png)
|
| 2F |
|---|
.png)
|
| 3F |
|---|
.png)
|
| 4F |
|---|
.png)
|
| Exterior 1 |
|---|
.png)
|
| 5F |
|---|
.png)
|
| 6F |
|---|
.png)
|
| 7F |
|---|
.png)
|
| Exterior 2 |
|---|
.png)
|
| 8F |
|---|
.png)
|
| Roof |
|---|
.png)
|
Enemies
| Enemy | 1F | 2F | 3F | Roof |
|---|---|---|---|---|
| Fyeye | ✓ | |||
| Death Slugger | ✓ | ✓ | ||
| Armored Veil | ✓ | ✓ | ✓ | |
| Dark Widow | ✓ | ✓ | ||
| Living Armor | ✓ | ✓ | Story | |
| Raging Armor | Story | |||
| Campanella the Fool | Story | |||
| McBurn, Almighty Conflagration | Story | |||
| McBurn the Blazing Demon | Story |
Treasure Chests
| Key | Contents |
|---|---|
| 1 |  Holy Sphere Holy Sphere
|
| 2 |  Black Bell Black Bell
|
| 3 |  U-Material ×5 U-Material ×5
|
| 4 |        All Sepith ×50 All Sepith ×50
|
| 5 |  Onion Seeds Onion Seeds
|
| 6 |  Luck Luck
|
| 7 |  Tearal Balm, EP Charge III, Celestial Balm Tearal Balm, EP Charge III, Celestial Balm
|
Quests
- Field Exercises - Crossbell: Class VII tracks Ouroboros' Aion to Stargazer's Tower.
영웅전설 섬의 궤적 IV
Maps
| Outside |
|---|
.png)
|
| Entrance |
|---|
|
|
| 1F |
|---|
|
|
| 2F |
|---|
|
|
| 3F |
|---|
|
|
| 4F |
|---|
|
|
| Exterior 1 |
|---|
|
|
| 5F |
|---|
|
|
| 6F |
|---|
|
|
| 7F |
|---|
|
|
| Exterior 2 |
|---|
|
|
| 8F |
|---|
|
|
| Roof |
|---|
|
|
Enemies
| Enemy | 1-4F | 5-7F | 8F | Roof |
|---|---|---|---|---|
| Speculo I | ✓ | ✓ | ||
| Speculo II | ✓ | ✓ | ||
| Octogeist | ✓ | ✓ | ||
| Fyeye | ✓ | ✓ | ||
| Death Slugger | ✓ | ✓ | ✓ | |
| Living Armor | ✓ | ✓ | ✓ | |
| Golden Pom - 8 | W/ Living Armor | W/ Living Armor | W/ Living Armor | |
| Loa Phantasma | Cryptid |
Treasure Chests
| Key | Contents | ||||||
|---|---|---|---|---|---|---|---|
| 1 | Brave Seed
| ||||||
| 2 |  Genbu Genbu
| ||||||
| 3 | Passionate Rouge
| ||||||
| 4 | All Sepith ×200
| ||||||
| 5 | U-Material ×5
| ||||||
| 6 |  Umbral Gyre Umbral Gyre
| ||||||
| 7 | Zeram Powder
| ||||||
| Trial |
|




Quests
There are no quests in this location.
Gallery
영웅전설 제로의 궤적, 벽의 궤적
-
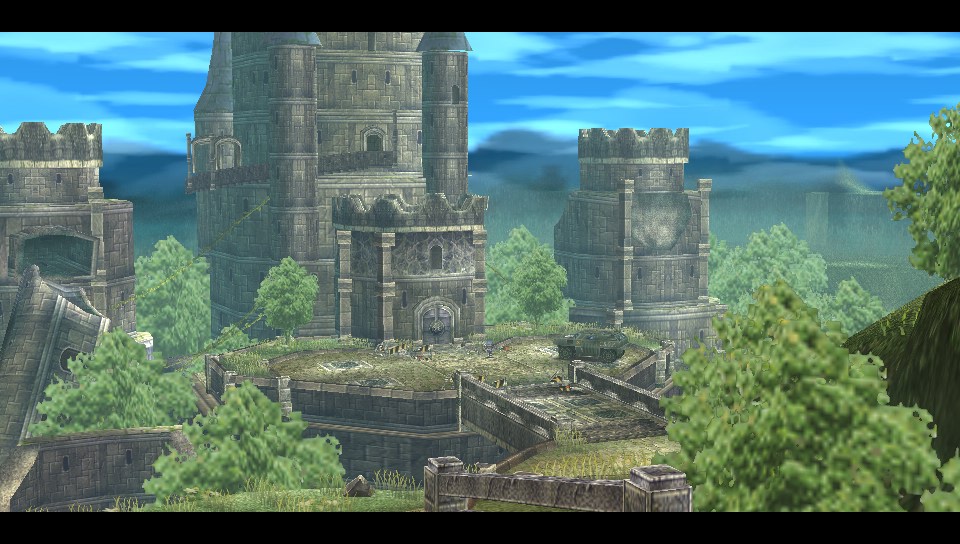 Exterior
 -
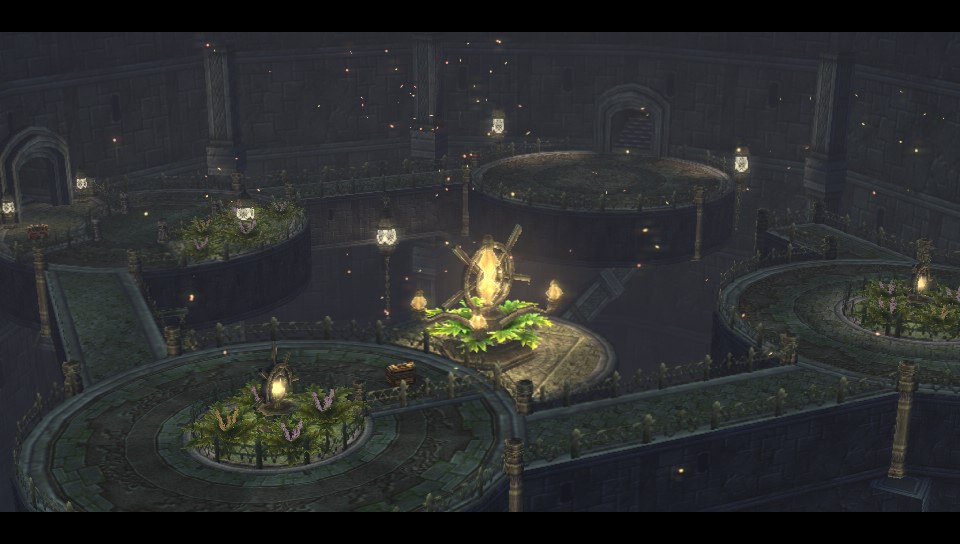 General interior of the Stargazer's Tower
 -
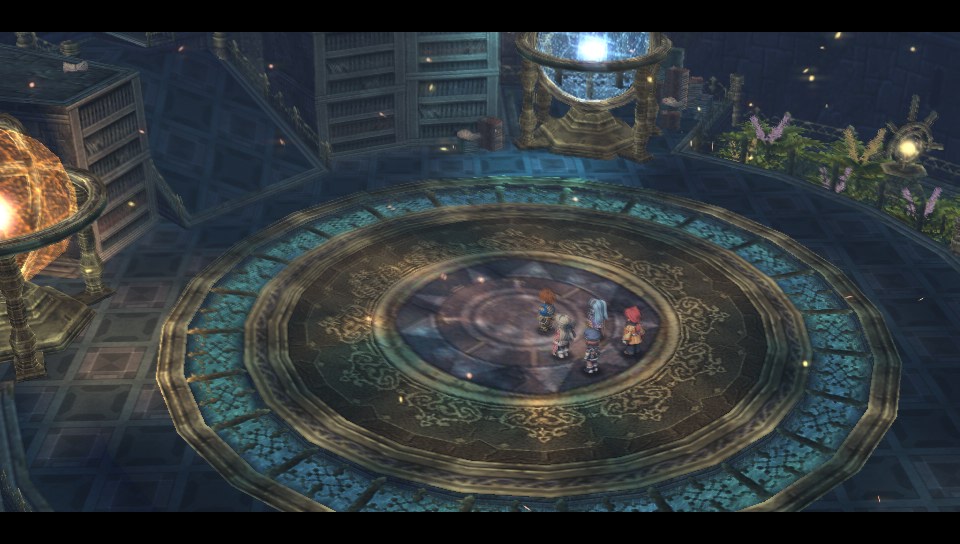 Library and armillary sphere-like objects
 -
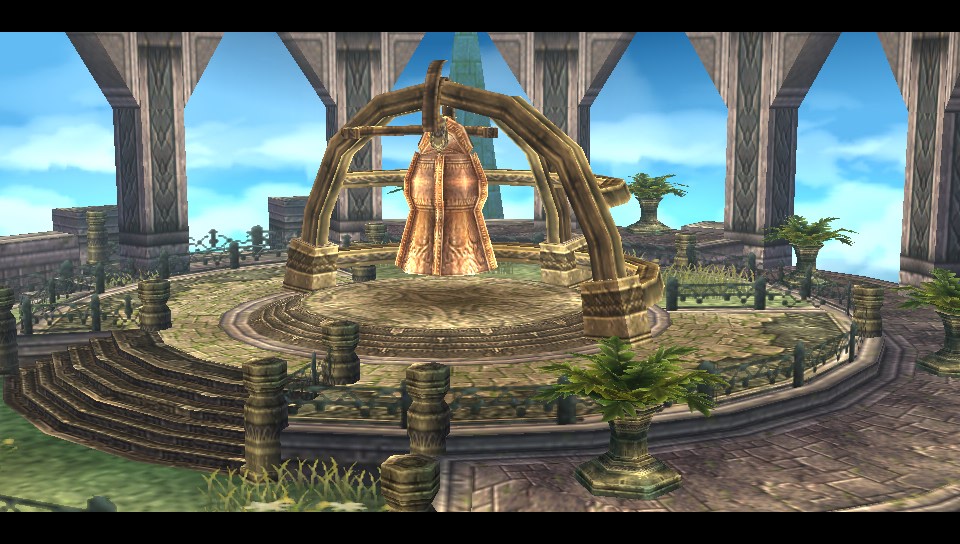 Bell on top of the Stargazer's Tower
.jpg)
.jpg)
.jpg)
.jpg)
영웅전설 섬의 궤적 III
-
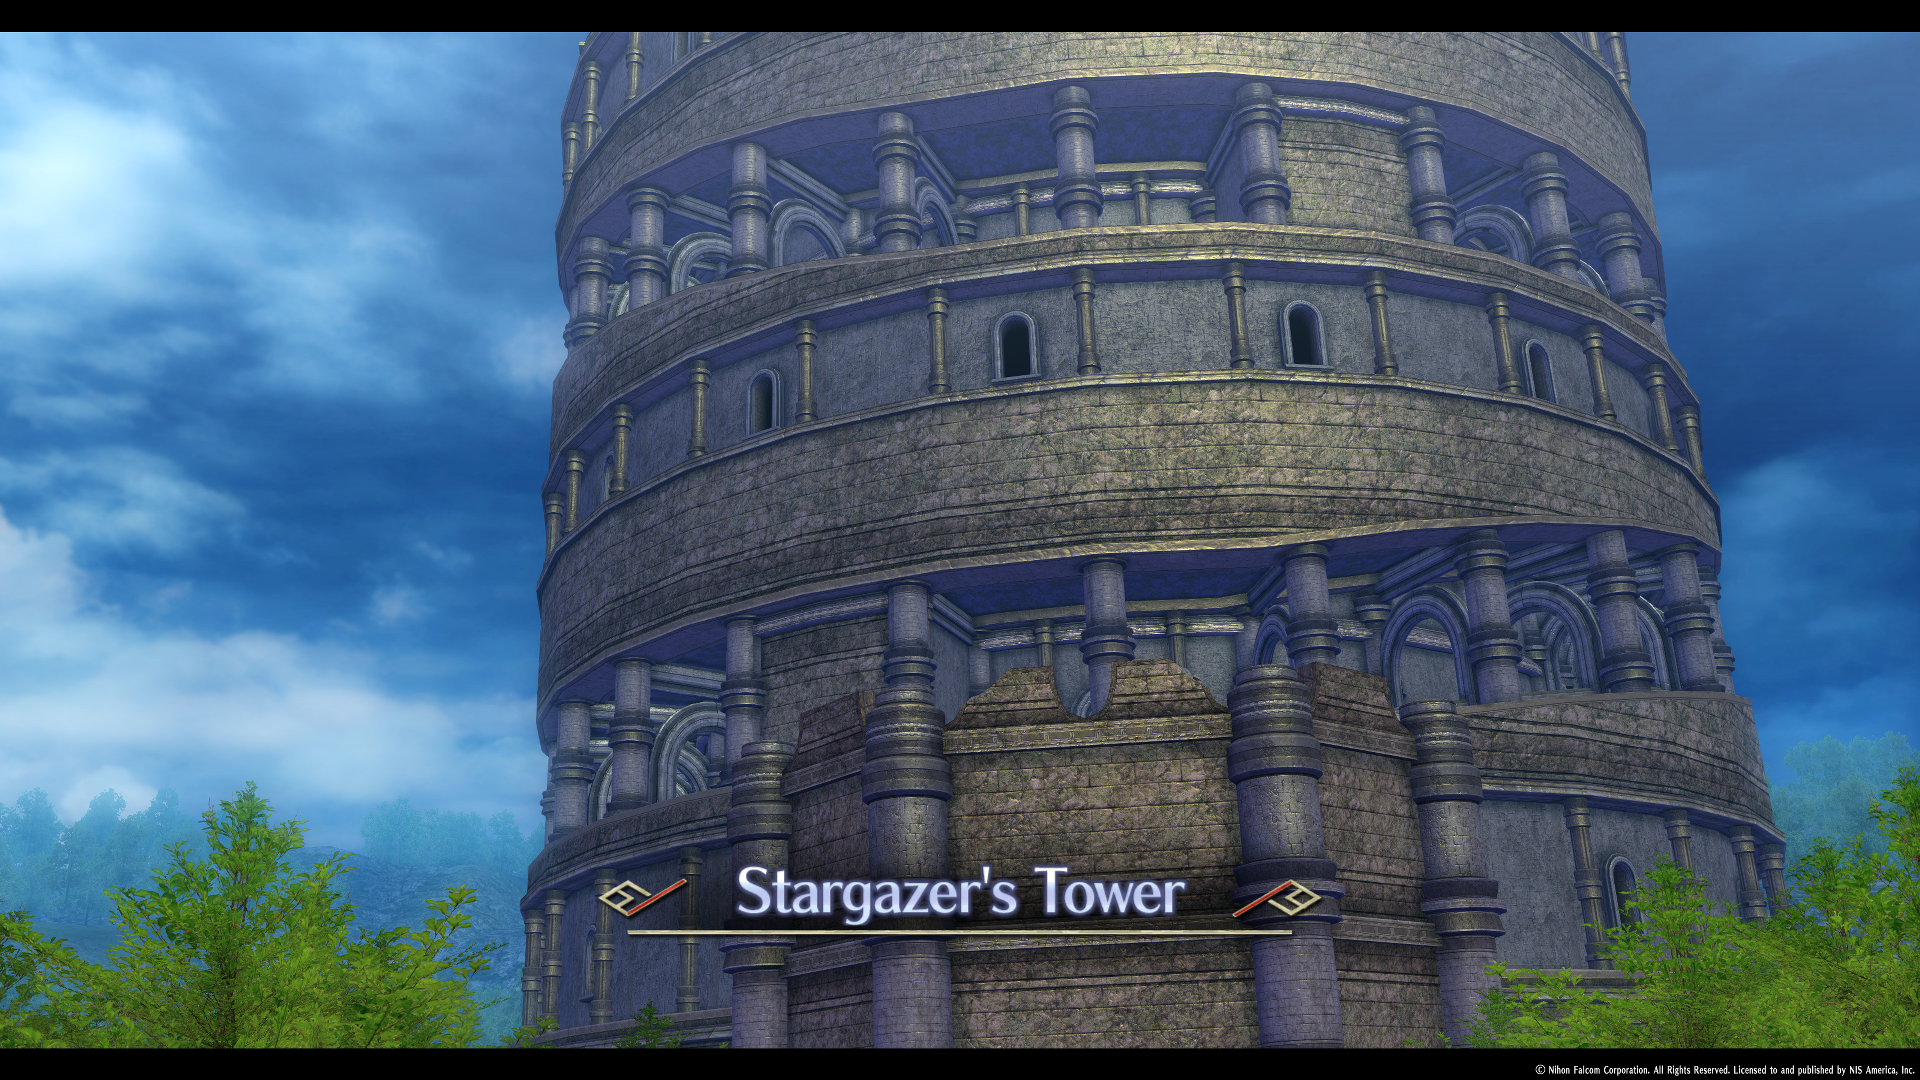 Introduction
.png)
Map of Crossbell State
 | |
|---|---|
 | |